Smart Cover for iPad 1
When the iPad 2 was announced, like most people, the part that I was most intrigued by was the new Smart Cover. I had nearly convinced myself it was reason enough to upgrade, but eventually calmed down and figured it would be wise to wait for the rumored Retina Display. I wondered though, if it would somehow be possible to retrofit the original iPad to utilize the Smart Cover. Turns out, it’s actually pretty simple.
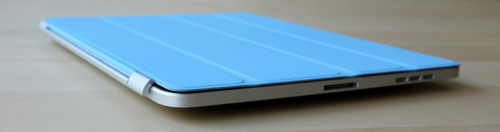
Before ever seeing a Smart Cover in person, I figured this hack might need to be much more involved, perhaps even needing a 3D printed part that would interact with the hinge in some way. After getting the cover in the mail on Friday, I realized that the solution could be much simpler. The flat edge of the iPad affords a perfect area to place a few thin magnets, and the hinge on the Smart Cover can lay flush across them. Coincidentally, the dimensions just happen to work out, and the right edge of the cover lines up nicely with the right side of the iPad.
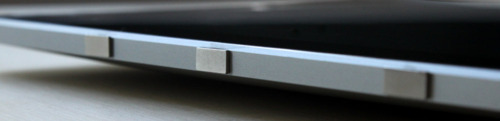
I purchased several different types of rare earth magnets from K&J Magnetics. I ended up using block magnets, 3/8" x 3/16" x 1/32" (found here). These particular dimensions work nicely because they sit flush on the iPads edge. I wonder, however, if the round equivalent might feel a little nicer (no sharp edges). Shipping ended up costing more than the magnets themselves so if you are ordering try to team up with some friends.
To place the magnets, I stuck them first to the magnetized hinge of the Smart Cover. I slid them around until they became locked into a position. This ended being asymmetrical, but I didn’t mind. I then lined up the cover with the iPad and used masking tape to mark where the magnets should be placed. I wanted this to be a somewhat permanent solution, so I used super glue to affix the magnets to the iPad. If you are not so daring, or want to test it out to make sure you like it, just use transparent tape. Even though the super glue keeps the magnets secure and in place, they are actually pretty easy to remove by just “chipping” them off with a flathead screwdriver and a very light tap of the hammer.
All in all, I am pleased with how it turned out. The biggest downside is not being able to have the iPad automatically turn on when the cover opens (as in the iPad 2), but this will hopefully tide me over until the next revision.
Check out the video below (or on Vimeo) to see it in action.
March 21, 2011 / 221 notes
red-gummybear13 liked this
blackandsheep liked this
 rancidrum liked this
 beckiboo247 liked this
dirty-blue-cannibal liked this
geekinggirl84 liked this
defeater-i-d0nt-mind liked this
tropical-indy-blog reblogged this from russianpencil-blog
 haleysocoolclegg liked this
 nicecoldice liked this
copywriter-copywriting-blog reblogged this from russianpencil-blog
thetattooedarchaeologist-blog liked this
lemongrasska-blog liked this
myhomestoriesx-blog reblogged this from russianpencil-blog
day-spa-marketing-pro-blog reblogged this from russianpencil-blog
wjlafrance liked this
- newsmarriage-blog liked this
nikon-d7000-reviews-blog reblogged this from russianpencil-blog
iwishihopeiwant liked this
russianpencil-blog posted this
- Show more notes